Roblox Bee Swarm Simulator Wiki: A Complete Progression Guide
Welcome to the best Wiki and progression guide for Roblox Bee Swarm Simulator. Here, you’ll find everything you need to know about this game. You’ll learn the best progression path you can follow, along with all the tips and advice I’ll give you.
The Best Progression guide for Roblox Bee Swarm Simulator
Early game
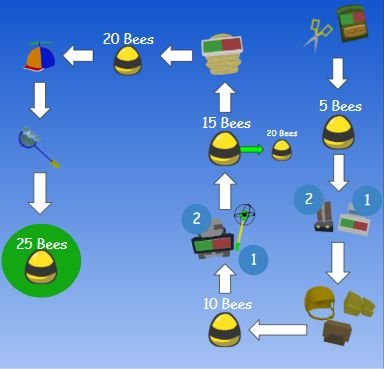
The green arrow means you should progress towards these items while following the rest of the progression.
🔵 The blue number means what order you should get the items in (when items are clumped) if no blue number is there, order does not matter.
When you start playing, you should activate the following codes:
- "BeesBuzz123": Cloud Vial x1, Bitterberries x5, Gumdrops x10
- "38217": Ticket x5
- "BopMaster": Ticket x5
- "Connoisseur": Ticket x5
- "Crawlers": Ticket x5
- "Nectar": 5,000 Honey
- "Roof": Ticket x5
- "Wax": Ticket x5, 5,000 Honey
These codes will give you materials and Honey. You should save the Boost Codes for later.
What you do in the Early Game doesn’t matter much—just go with the flow and aim to reach 25 Bees.
Mid game

The green arrow means you should progress toward these items while following the rest of the progression.
 If you macro often, skip the Golden Rake and keep the Bubble Wand.
 Get Elite Guards and NOT Bucko/Riley Guards, as those will slow down progression (too expensive, little gain).
 Start trying to get the Crimson/Cobalt Guards here. The best order is Cobalt, Vicious, Crimson. If you’re close to the Diamond Mask, push these off until later. Just get them whenever it’s viable and makes sense for your progression.
Why Bubble Mask instead of Honey Mask?
The bubble mask can provide a huge honey advantage if you tilt towards blue considering pollen is better than quests. The ability for honey mask is not that great, because it requires a lot of time to activate. (30 mark tokens + cooldown) and there’s a high chance that it will just activate at completely useless time. The bubble mask has permanently capacity buff which means it will always be useful. The honey mask ability also makes you run around field, which means you might lose your ability buff stacks. The blue pollen allows for better casual grinding in blue fields and it provides MUCH better macro as well. Lastly, buying the bubble mask allows you to use golden eggs early game which saves you a bit of time.
 Make sure to obtain the planters shown in the image to progress even faster, as they will help you collect nectar, which is useful for gathering the maximum amount of Honey.
Late Game
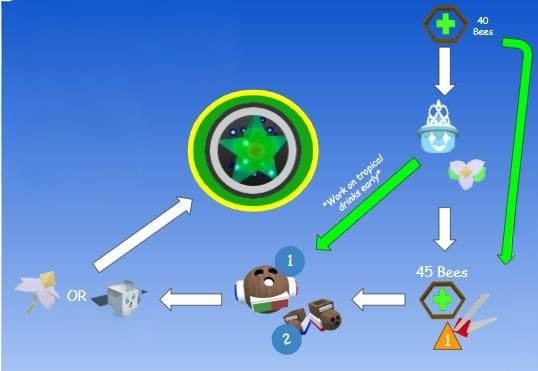
The green arrow means you should progress towards these items while following the rest of the progression.
🔵 The blue number means what order you should get the items.
If you macro often, skip the golden rake and keep the bubble wand
SSA should be your absolute priority. Spare honey can be spent to gifted types.
Why should i get Belt first?
The petal wand is barely an increase (20% MAX from REAL stats) to the porcelain dipper, and tool collection will be almost margin of pure honey gains. The capacity buffs from the petal wand are superior and play a huge role in progressing through early and mid game. The price of the belt is simply overrated and won’t take more than a week or a few days to obtain. This is also while the petal belt is an actual sizeable upgrade from the honeycomb belt, being.
Petal Wand or Windy Bee? What to get with second Petal?
| Petal Wand | Windy Bee | |
|---|---|---|
 |
 |
|
| Pros |
|
|
| Cons |
|
|
Very late game
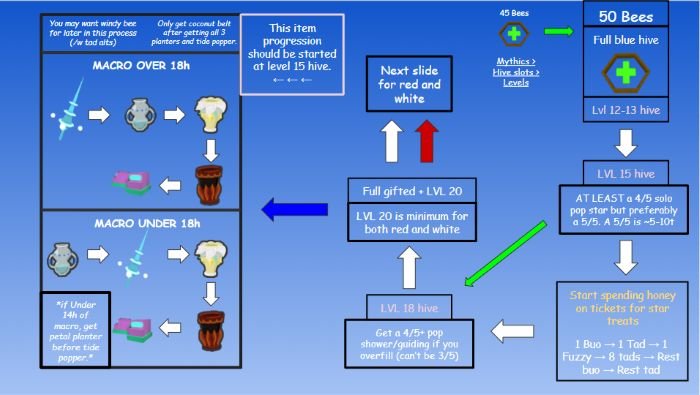
You should have 45 bees at this point. Keep buying Hive Slots and leveling up your bees. Additionally, you need to continue building your Blue Hive.
Once you’ve reached 50 bees and have a complete Blue Hive, with each bee at level 12–13, you can start leveling your bees up to level 15. At this stage, you should have at least a Supreme Star Amulet with Pop Star, 4/5 stats. A 5/5 amulet usually costs around 5–10t.
Then, start spending Honey on tickets to buy Star Treats from the shop and make the following bees Gifted: 1 Buoyant → 1 Tadpole → 1 Fuzzy → 8 Tadpoles → remaining Buoyants → remaining Tadpoles.
Bring your Hive to level 18 and obtain an SSA 4/5 Pop Shower/Guiding Star if you overfill (it can’t be 3/5).
Finally, what you need to do is level your Hive up to level 20. Level 20 is the minimum for both red and white.
If going Red Hive
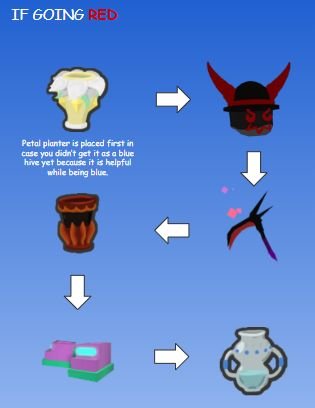
- Get Digital Bee and Coco Belt eventually
- Coco belt isn't required for red, you can function as red, but you need coco belt for white because of the honey from tokens buff.
If going White Hive
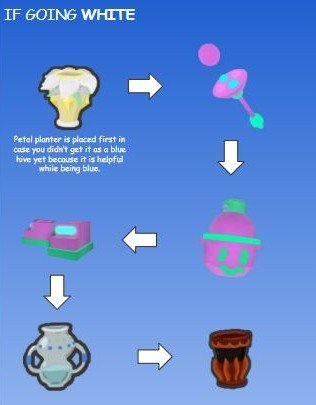
- Get Digital Bee, Windy Bee and Coco Belt
- Digital Bee is required for both hive colors. Grind drives after you switch.
Event Bees
Event bees are some of the most important bees in the hive thanks to their abilities, which make them unique.
Event bee purchasing (not gifting order)

- Get the first 3 event bees, and then buy star treats whenever possible. Do this until you run out of bees to use it on, and then wait for the next bee to be obtained.
- Do not spend tickets on stingers or gumdrops to get gummy or vicious faster, prioritize these event bees and then the star treats.
Event bee gifting order

- Vicious is placed high due to it being high priority, just gift it whenever possible and skip it if needed.
- Buoyant is placed high due to it being high priority, just gift it whenever possible and skip it if needed.
- Your final gifted types for SSA should just be mythic bees while you are early blue.
Important materials to save
You should save most of your materials, but these are the most important ones:
- Star Eggs: super important to use properly to get SSA quicker
- Gumdrops: needed for Gummy Bee (2.5k)
- Diamond Eggs: super important to get the Diamond Mask later
- Stingers: needed for many things like Vicious Bee and guards
- Star Jellies: needed for the Petal Belt later (25)
- Glitter / Moon Charms: Glitter is very scarce and needed for many items during progression